We bloggers. We’re addicted to Pinterest. Seriously. Addicted. Addicted to the point of distraction …
Some of you out there (yeah, you know who you are) have thousands upon thousands of pins.
Here are my current Pinterest pin stats:
That reads like inspiration overload to me. And the chances that I follow through with the projects I’ve pinned is hovering around a 1% return-on-pin …
… if that …
But this pin …

… this pin was pinned with a purpose. With a plan.
The minute I saw this I was inspired to recreate it in my teen son’s room redo.
It’s a drum shade decorated with washi tape. Created by Jackie of the uber modern Teal & Lime blog. You can check out Jackie’s tutorial here …
… and Jackie’s amazing Teal & Lime blog here.
And now you’re probably scratching your head and asking, “What in the world is this washi tape substance … ?”
… because that’s what I was scratching my head and asking after I landed on Jackie’s tutorial…
Well ask no more. I Googled it. Because that’s what I do.
I discovered that washi tape is a Japanese paper masking tape that comes in a variety of different colors and patterns. It’s easy to tear by hand. You can write on it. And here’s the kicker that sold me …
… it’s not only easily removable …
… but can be easily removed and reused.
What? Could it be? Fool proof tape … ?
So I ordered some of that washi tape from this Etsy shop …
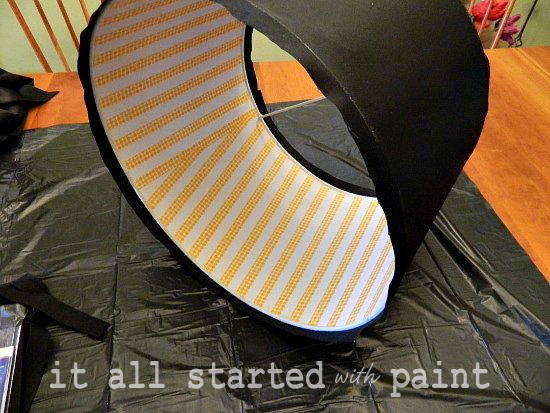
… and a few days later got to work …

I used a piece of that easily removable — and easily reusable — black washi tape as my spacer between stripes …

… and worked my way around the drum shade from right to left …

… leaving extra tape on each end of the drum shade rims that I trimmed later.
When I neared the end, I realized my stripes were now angled since there was an inch or two difference between the circumferences of the top and the bottom of the drum shade …

So now I could either apply some math …
… and you know how math and I don’t see eye-to-eye …
… or I could fudge it.
I fudged it.
Like so …

… and so …

… because, seriously, who will be inspecting this project as closely as I? No one, that’s who.
I finished it off with some black washi tape on the inner and outer rims …

… and once I was done, I stood back to inspect my project …
… and I wasn’t happy.
🙁

Perhaps because my inspiration Pinterest pin featured a black drum shade.
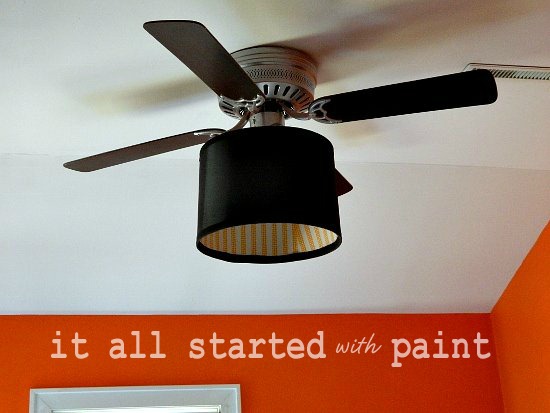
So I did what any self-respecting diy-er would do. I found the perfect $1-a-yard black fabric and covered that shade using some spray adhesive and fabric glue …

… using double-sided bias tape to finish off the edges …
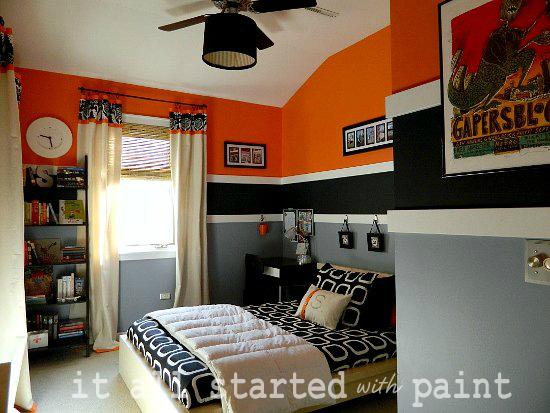
And here’s a peek at the finished product …


It’s in my teen son’s room remodel which I reveal here … and you can find part 2 of the ceiling fan makeover here …

P.S. If you feel oh so inspired to follow me on Pinterest, click here …
P.P.S. If you feel oh so inspired to pin Jackie’s inspirational drum shade, please click here … and pin it from her blog and not mine. I’d like to give Jackie her credit due ….
You Might Also Like …
I’m like you with the math–that’s why I have a husband. To do math and reach the high stuff. But the shade looks great-like the black!
Linda, I love it! Imagine my surprise when I start reading your post to see what pin of your hundreds you decided to tackle and then to see my washi tape lampshade! I am so glad you liked it. You executed it just like I did right down to the fudging it in the end. I love your choice of a bright, fun tape to add a pop of color. Great eye too…I thought the white was nice, but the black is amazing. Thank you for sharing my pin and sharing your project!
Love your lampshade! must order some of that washi tape…
That looks great and look forward to the room reveal. Thanks for sharing at Wow.
That looks great, well done, I might try it for our bedroom.
OK…the half Japanese in me should know this tape exists!..but then again, the half Irish in me doesn’t…so I shall give “my other half” a pass…the lampshades look wonderful….waiting for the big reveal..!
Awesome! and I am totally a Pinterest Junky – I’m not even going to share my stats with you!!! (& I haven’t been using Pinterest for very long either…)
xox
Linda, this is outstanding. I can’t wait to see the big reveal for your son’s room!
Linda, I love it!! You did such a beautiful job!
xoxo,
mk & Gwynnie
Oh it’s fabulous. You did a great job!
Your son should be bringing you breakfast in bed and rubbing your feet (wait, no – that last part is a bit weird)!
Love the color choice and I need to get that tape!
Kelly
Awesome…simply put!!!!
Well “check you out” you are so clever 🙂 NICE!
I love the washi tape idea! and the black on the outside really makes it more of a statement.
I really like this! Especially with the black on the outside! Can’t wait to see the room all together!
It’s lovely! And BTW, I’m glad you mentioned that your follow-through with Pinterest projects is low — mine is probably even lower 🙂
Love this project! It turned out terrific! I haven’t used any washi tape, yet, but really have to get my hands on some. Thanks for sharing.
Love this idea! Your son’s shade came out great! How fun.
I’ma likin’ this idea!! I’m a little mathmatically challenged myself, just rock on, sista-freind!!
Wow, I LOVE your lampshade….it looks fabulous! I am beyond mathmatically challenged so I can only imagine what my shade would look like….a hot mess I’m sure!!! LOL
~Des
Nice job, my friend! Can’t wait to see his whole room 🙂
I love your shade…Thanks for stopping by…I am following..Blessings, Becky
I love your shade…Thanks for stopping by…I am following..Blessings, Becky
That is beautiful! Great job!
That is some amazing tape! Love the lampshade, well done Linda! (I’m literally clapping, I love it so!)
It really creative and artificial project.It look so attractive and different.This one is really best job.
Soldes 2012
Now this is seriously cool! I love how it turned out 🙂
xo Catharine @ Your Modern Couple
I love this project and am excited to see your son’s completed room.
Hi Linda! So glad to have found this project. I’ve been wanting to cover some shades and wanted to ask about the double sided bias tape. If I go to the fabric store and ask for it will they know what I’m talking about? Or where else can I find it?
I have to get some of that washi tape too. Thanks for the tips!
I love washi tape– I really need to buy some for crafts. Every washi tape craft I see is absolutely precious, including this one. Great job, and thanks for linking up with the Winter Pinterest Challenge!
Erin @ The Great Indoors
P.S. Thanks for posting TWICE to the challenge– you get bonus points! 🙂
Love the drum shade! How did you attach it to the fan w/o the light bulbs showing above the shade? Did you need a special conversion kit?
I, too, NEED to know how you hung the drum shade to the ceiling fan; do tell!
I really need to get that ceiling fan makeover post written up and posted … just think picture wire …
🙂
Linda
This is awesome! I love the drum shade attached to the fan… any tips or tricks?
Love EVERYTHING about it!!!
with that.. HOW IN THE WORLD DID YOU ATTACH THE SHADE!?!? My brain just can’t make sense of it 😉
BRAVO!!
Love it, Linda! I featured your lamp shade here: http://www.craftaholicsanonymous.net/washi-tape-crafts-reader-roundup thanks for joining the party!
happy crafting,
Linda
how has the washi tape held up with the lights being so close? (stopping by from Craftaholics anonymous)
It hasn’t been an issue. Actually, the bulbs are further away from the drum shade than they appear in the picture …
🙂
Linda
Featuring YOU today in my washi tape round-up. Great job!
Ginger @ gingersnapcrafts.com
http://www.gingersnapcrafts.com/2012/05/where-do-i-buy-my-washi-tape-washi-tape.html
This looks great with the black shade. I have been hearing of this tape and never quite understood what it was. Now that I see it, I want to do something with it! Thanks. Great job!
I haven’t used washi tape yet–I need to get some!! This is so great!! Love the color combo!
Shannon@SewSweetCottage
LOVE this idea! The black with the washi tape looks great!
I featured you on my blog today, come check it out:
http://www.artsyfartsymama.com/2012/05/pinteresting-features-n-shtuff-33.html
Way to improvise with the black fabric!! It turned out so beautifully, Linda!! SO impressive. I’ve just got to get my hands on some washi tape. Would be delighted for you to link up with us over at Mop It Up Mondays: http://www.ishouldbemoppingthefloor.com/2012/05/mop-it-up-mondays-17.html
Thanks Bunches!
{HUGS},
kristi
Your fan looks gorgeous and the tutorial is fantastic! I’ve got this linked to my ceiling fans roundup post as well today, nice job!