The whole ‘blondes have more fun’ is overrated …
I think it’s a conspiracy cooked up by hairdressers and hair dye manufacturers. I was certainly fooled by — and drawn into — their marketing campaign promises for way too many years (and too many dollars).
Plus, if you throw in the whole ‘dumb blonde’ thing, then how do they know they’re having more fun … or any fun at all?
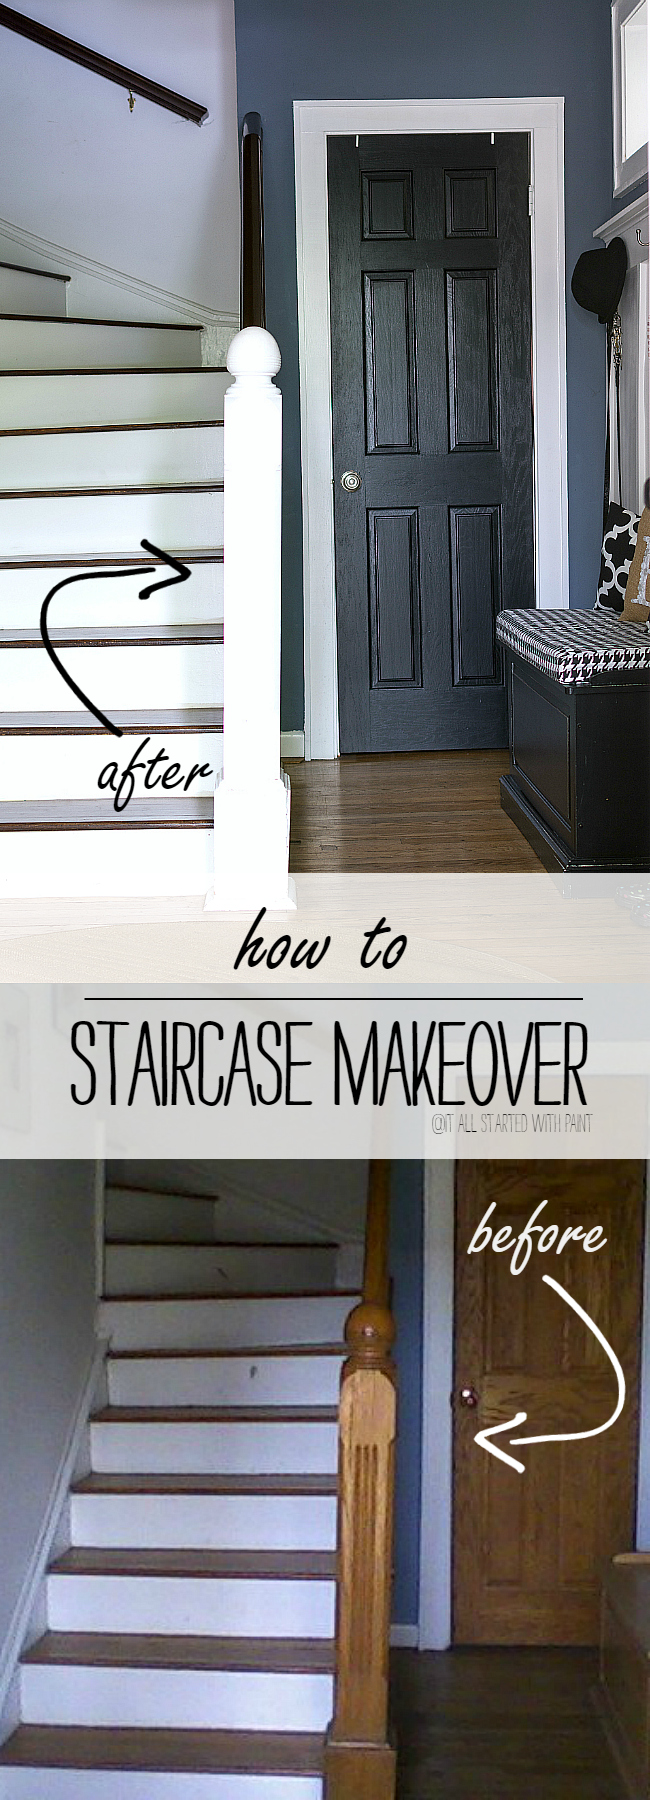
As proof that this expression carries no weight, just take a look at my previously blonde-colored wood staircase …


There was absolutely nothing fun about that (just ask Ernie the beagle) …


… though the building code people have labeled my 100+ year old accordion staircase ‘dumb’ (and dangerous) and haven’t allowed builders to build this particular staircase design for decades …
So, much like I gave up the expensive highlights and maintenance needed to keep my locks blonde and embraced my brunette DNA …
… I decided it was high time to give our dumb blonde staircase an extreme makeover …
 (2)")
Now, our home was originally built in the late 1800’s and the staircase is one of the only original architectural features remaining. Having withstood more than 100 years, I was a bit concerned with my plans to paint the newels and balusters …
… but when I shared the idea with the husband and he didn’t even blink, I took that as my green light.
This project was, by far, the most challenging thing I’ve ever done around the house. Up to this point, I was primarily paint. Like on the walls paint. But this (click here) tutorial gave me the confidence to give it a try …
Oh, and it truly tested my patience … or lack thereof. I’m an instant gratification kind of person, but the staircase necessitated working every other step at a time. And multiple coats. And drying time …
1. Stripping. I started by stripping the railing and steps. This was time consuming and exceptionally messy job. I had all good intentions to go with the “greener” product but, well, did I mention that I’m impatient? The toxic, strong smelling stuff worked much faster and better …

… especially when I used this 5-in-1 tool to reach the corners and maneuver around the curved surfaces of the railings …

2. Sanding. I pulled out the sanding blocks and sanded the steps and railings …

… and then sanded and sanded and sanded again. I wanted to make sure all the polyurethane was removed. Otherwise the stain would turn out all blotchy. Then I cleaned it all up with some Swiffers. And then I wiped it all down with a damp sponge and paper towels.
3. Staining. I started first on the railings with a Min-Wax product. But I wasn’t pleased with the deepness of the color – it looked like it would take 10 coats to achieve the look I wanted – so I did a bit of online research and settled on a Sherwin-Williams product …

Brazilnut, SW 3130


4. Painting. Once the stain was dry – I gave it a few extra days to be extra sure – I covered up the steps with painter’s paper and taped off anything that wouldn’t be getting a coat of paint. I primed first with Zinsser 1-2-3 because I didn’t know if the previous paint used was oil- or latex-based. Then I gave it three coats of oil-based BM Super White semi-gloss and let it dry for a few days …


… and when I pulled up the tape I discovered quite a few blotches and mistakes. But I took care of that potential disaster in Step #6 …
5. Polyurethane. I found myself once again with painter’s tape in hand. This time I taped off the “white” on the risers, newels and balusters. And then I applied two coats of clear satin Min-Wax polyurethane. Once again, I worked every other step.
6. Caulking. The healing powers of caulk should never be underestimated. Seriously. It’s the DIY-ers best friend. And I used that caulk to fix all those painting blotches and mistakes and to create perfectly straight lines where the steps meet the risers and mouldings …
 (2)")

 (2)")


I think she looks so much more fun …

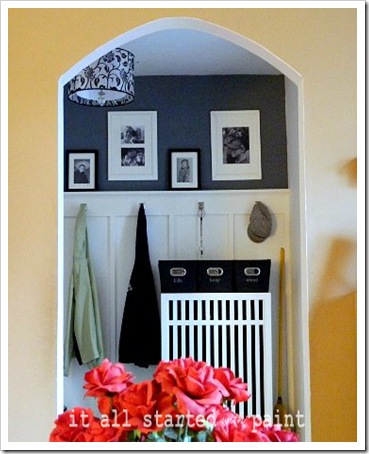
P.S. You can see the full entry makeover here …
WOW! The staircase looks amazing! I am so impressed and your family must be very patient.
As someone who assumed I ws just another dumb blonde until my mother showed me my IQ scores from the 1960s (no wonder I was put into reading groups in other teachers’ classrooms!), I approve of this makeover.
Three cheers for brunettes! Really great job on the staircase Linda. I bet you have real problems getting bulky furniture up those stairs, we have a curve in our stair case and had to take all the railings off when we moved in just to get a queen sized bed up
I am dying to rip off the carpet to my stairs and spruce them up. I painted the stairs to my basement, but I think I want to try stain on the next round for a more traditional look.
And YOUNGER too! Wow, what a transformation and what a lot of work – you and I should take a vacation from all this paint & stain work & go somewhere fun so we can prove your theory that brunettes have more fun!!
🙂
Linda, your stairs look BEAUTIFUL. That is a HUGE job but what a transformation! Great job!
Turned out great!Our previous house had wood floors in every room including the stairs.I loved the look.But we had several falls down those slippery stairs.
Absolutely FABULOUS!! It was all I could do not to scroll down to the bottom immediately! Kudos for the hubby that doesn’t mind the wood being painted, too! 🙂
It just goes to show that anyone {anything} wearing the wrong color will date them and make them seem “off” … wrong hair color on a person, wrong stain color on stairs. Love that brazilnut stain and boy does that stairwell look modern, fresh and sharp now! I wonder if I should go “brazilnut” … looking modern, fresh and sharp sounds oh so appealing 🙂
What a huge job! I did this when we first purchased our home and I hope I never have to do it again! Looks beautiful though!
I’m surprised the wood was still so blonde after so many years. Would have expected it to show a little darkening over time – you made it grow up and look TONS better!
It truly looks amazing… It may’ve been a lot of work, but the results are so rewarding. You did a fantastic job!
xoxo
Kristin
theocdlifestyle.blogspot.com
A huge task but so worth it–it’s beautiful!
You are a trooper! Ever feel like you should have bought stock in 3M (or whatever the painter’s tape brand is)? Wow, you persevered and it paid off! Absolutely gorgeous and totally updates your entire area.
That is so lovely! did you have any concerns about lead paint? And did you take any precautions? The only thing really standing between me and redoing my staircase is it’s painted already. I am concerned about stripping away any paint and the potential for lead. 🙁 I LOVE the look of yours and that’s what I want…instead I have yellow and brown.
That was a seriously major undertaking, but I would say it was totally worth it – your new brunette staircase is gorgeous! The darker wood is so much richer than the light wood, and it looks fantastic with the grey in your entry (which is also pretty fab!)
Kelly
That look like a ton of work, but so worth it! It turned out fabulous!! Makes me almost wish I had a staircase to redo 🙂
It looks so good! You did an awesome job with those stairs! I’d love to do our risers white, but I think my husband would have a heart attack if I even suggested it!
Oh my goodness! Love the steps so much! I’m painting mine so I know what an undertaking this project is. They look gorgeous Linda!
Heather
they look fabulous. yay for brunettes. is it wrong that i don’t mind the smell of citristrip?
The steps look fantastic! This project was well worth the time and effort – great job!
Lovely job! Kudos to you.
That looks lovely… so, so wonderful. Lots of hard work paid off… It is amazingly gorgeous.
Wow…hard work!!! But, as all things that take forever…it was worth it!
Being one, I always thought brunettes were sharper and smarter looking. 😉 Your staircase looks quite sharp and smart now, too. A great transformation and new personality.
Wow! What a change! it looks terrific! Brunette for sure is better in this case!
Let’s just get something straight right now, BRUNETTES ROCK!! and i am still in love with your entry, stairs and all!
Another shout out for brunettes! Your stairs look marvelous Linda, love it!
This is GORGEOUS! She looks so much fresher and newer as a brunette!
OoOoOhhh, Linda! You did an amazing job! Gorgeous!!!
Hi there, I’m a new follower. Wanted to tell you what a fabulous job you did! That was a MAJOR undertaking with HUGE results! Nothing ‘dumb’ about that staircase now! 😉
It looks great Linda! You did a wonderful job, I love it! I don’t think I could walk for a week or more if I tackled something this big!!
Debbie
Gorgeous! What an undertaking!
Ohhhhh snap! I think she was born to be a brunette!
Stunning! I am in awe of you!!! I am DYING to do this to my stairs. It looks pretty daunting though, so I have to gear up! I also have carpet to pull up.
She definitely looks better as a brunette! Having been both brunette and blonde myself, I hesitate to say when I’ve had more fun. Let’s just say that they both have their merits! 😉
xo-Lisa
This is such a beautiful transformation! I dream of doing this to my staircase. The way my staircase was built I can’t replace the carpet on them without ripping out the entire staircase and starting over which is not in the budget. Your stairs look sooo good and I love your wall color. Great job!
Angie 🙂
What an amazing transformation! I love the way it turned out. And I’m seriously impressed with the amount of work that was involved. Well done!
You did a fantastic job. I am just too old to tackle that.
I’ve refinished many things, but this would be a nightmare! It was worth it though, because it turned out stunning. I think the original builder would be pleased. They look so much more elegant now.
Have a lovely week!
Deborah
I love this! I would love to re-do mine, but I’m just not sure I have the stamina, patience, you-name-it – I don’t have it!! lol! I’ll just sit back and be jealous of yours! 🙂
WOW! That looks like sooooo much work but you did an amazing job. Those stairs are absolutely gorgeous. Gorgeous!!!
That’s a major project! Looks great though. You really did a good job.
Gorgeous! A lot of work but well worth it!
A-MA-ZING!!! You must be so proud!!!
looks fantastic!!! i’m dying to do something to my staircase…like rip up the ugly carpet, but i’m just to lazy to start such a big project. :o) your staircase may have given me the inspiration i needed!
I love what you have done with the stairs!! Its so beautiful! I would love for you to link this project up at my link party – Well Crafted Wednesdays! You can find it here:
http://thewellcraftedhome.blogspot.com/2012/04/well-crafted-wednesdays-link-party-1.html
Just BEAUTIFUL!! The only thing I would have done differently, would be the closet door. Paint it white and install a full length mirror or mirror tiles to brighten it and reflect the beauty of the front door. Kudos for all your hard work, I personally know what an undertaking that is. 🙂
We have a brand new house (a year old in May) but due to a ‘moisture issue’ in the crawlspace the builder had to replace our hardwood floors a couple of weeks ago. And thankfully, since we bought the house already in the progress of being built and didn’t get to pick anything out like floor color etc, they said we could pick something different color wise. So we went darker; and I have to say it matches much better with black cabinets than the light tone did. But now the railing of the staircase is off because it’s very, very light in color. The banister is all white (kind of cottage-y in style) but just the top hand rail is a very light maple wood. Would you recommend all the stripping and such you did here for me to just change the hand rail? Honestly I wouldn’t even bother because I’m not that fussed to tackle it if it’s a huge job, but I know we are only going to be here another year or so. So I’m wondering if it’ll look ‘off’ for resale.
Thanks in advance for any advice. I love your blog 🙂