… why in the world are you so ugly?
And I’m not talking about what you’re reflecting back at us …
… well, unless of course I’m standing in front of you very, very early in the morning.
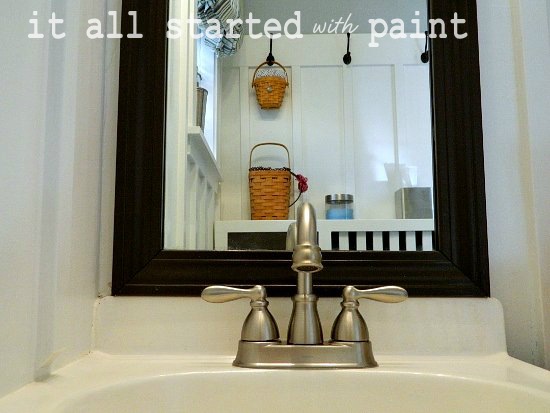
But honestly, you look unfinished like this …

Naked, in fact …
And yes, it’s true that you are located in a bathroom …
… a room in the house that typically does see some naked action …
… yet your nakedness was doing nothing to contribute to the aesthetic I was striving for …
So I had no choice but to pull out my miter box …


… and get busy cutting up some door casing moulding I picked up at Home Depot for just under $10.00.
The leftover casing will be used to dress up another ‘naked’ mirror slab in the master bedroom.
Then I gave both sides a coat or two of leftover Benjamin Moore Bittersweet Chocolate from the kitchen cabinet repainting project.
IMPORTANT TIP (you now know it’s important because I capitalized and bolded and underlined the words): But seriously, since I planned to affix the molding directly onto the mirror itself, it was imperative that the underside of that moulding is painted as well. You see, it will reflect back into the mirror.

I made sure to dry fit the moulding before applying the adhesive. I used Power Grab, but liquid nails would work equally as well …

And here’s where you can learn from my mistakes. I know. So generous of me to not pretend to be perfect and all …
I put a bead of adhesive on the outer and inner edges like so …

… and here’s my mistake that you will now learn from …

If you will be gluing the moulding directly onto the mirror like I did … then you SHOULD NOT PUT ADHESIVE ON THE INSIDE EDGE LIKE I’M SHOWING YOU UP THERE. IT WILL REFLECT BACK INTO THE MIRROR ….
… AND I’M SORRY FOR SHOUTING …
But unless you want to end up with this mess …

… and this mess …

… reflecting back at you day in and day out and multiple times each day (remember that this is the most visited room in our house) …
… I suggest you heed my hard-earned advice.
Luckily, I used the Power Grab product that dried clear. That is, it finally dried clear after an excruciatingly long 48 hours.


In the next step I should be showing you how I caulked the corners and touched up with paint …

But I didn’t have any paint to touch it up with …
… so I skipped the whole caulking step.
You see, I left it outside. For many, many months …

… in the hard, cold, and unforgiving Chicago winter …
Thankfully I painted the moulding trim when I painted the base cabinet before winter settled in …
… and I’ll fess up here that that painted mirror trim hung around the house (okay, taped to the mirror with painter’s tape) for month after month after month …

And since I have no intention of purchasing another gallon of that pricey BM oil-based Alkyd paint …

… I’ve convinced myself that I like the way it looks as is …

… all dressed up with a bit of door casing.
No touch up needed.

If you want to see more of the teeny tiny powder remodel, click here for the before and after …
… and click here for the lowdown on how I painted my sink …

Hi, Linda! Thanks for visiting! I’m so glad you did because we bought our first home last summer and we are getting ready to do some renovations and just through this post, I’ve learned some very helpful tips! Look forward to looking through more 🙂 Hope you have an awesome week!
~Erika
southernbelleasanarmywife.blogspot.com
My husband really needs to read your blog! I told him I wanted to do what you just did with the mirror and he said it couldn’t be done! I knew it could…but he’s a big dummy sometimes.
Soooo cute! Love the area you’ve created! Mirror, mirror…not ugly now!!
I’m loving it! Now it makes a statement in a cool, chic way! xo wendy
What a difference! Turned out beautifully.
This is seriously niice! And clever! Like it so so much!
Marvelous darling!just marvelous.
Like the finished product you did good a lot better the I could do……..but then a blind dog could do better then me……lol
What a big difference the frame makes! It reminds me once I was traying to do the same and I didn’t paint the back of the frame! The mirror reflected all that unfinish surface!
Impressive! I used to have a mirror in need of this!
I am now your happy LF follower 🙂
Can you come by and fix up my bathroom? Please?
I’ll trade more blogging secrets…lol…
Look great, Linda, seriously.
You free for coffee soon?
I love you….. You crack my cracker girl. And if you ever want to change the name of your blog then “No Need for Caulk” is a good one.
Love the mirror!
Blog Hopping – I’ve followed you via Linky Followers. Would love if you would follow me back.
Thank you,
Jeneen @ Suzie HomeCaker
suziehc.blogspot.com
Wow! Not only it’s a stunning transformation, but the “new” mirror simply anchors the room! Great job and you make it seem so easy… Thank you fir leaving such a nice comment on my happy entryway 🙂
Well, our motto is “good enough is good enough”! And I think your mirror looks great! Always appreciate seeing others’ “goofs.” Cuts down (a little) on how many I make. 🙂
I love it! That color is awesome…and the choice to love it as is is perfect. 🙂
Lovely finished project.
You are a miter box wielding goddess! It looks perfect – and if anyone comments on the lack of touch up paint – don’t invite them back!
Kelly
I LOVE it! So glad to have found you on The 36th Avenue today. And thanks for stopping by my blog too. I’m your newest gfc and Linky follower!
dixiedelights.blogspot.com
great improvement! It just looks so finished now.
Very nice!
This is great – we are working on remodeling our house room by room and are finishing up the bathroom right now. I’m coming over from the crazy cute link party and am your newest follower. Would love to invite you over to my blog on Monday for my “Get Inspired Monday Blog Party” – my favorites will be featured on my blog and facebook.
-Pamela, InspiredByFelicity.blogspot.com
I love your mirror! I’ll be framing mine as well – I have the wood, just need to stain it and assemble.
Barb
http://www.turtlesandtails.blogspot.com
so, what would you do differently: would you put adhesive on the outside edge and maybe the middle? Or just on the outside edge? And if so…would it be enough adhesive?
Hi Linda! Saw your link at a linky party and had to stop by your blog for a better look and to say hello! Your mirror looks fabulous with the makeover! So glad I found you – I am your newest follower. Please visit my blog to say hello as well. I love to meet new bloggy friends, comments and followers 🙂 Heather @ settingforfour.blogspot.com
My next project, in my master bathroom. Thanks for the step by step pictures will help me soo much. Great post!
Wa ha! You screwed up…way to keep it real! And thanks for linking up at Stinky Linky Party. Adhesive hanging out is just a way of life sometimes…thanks for sharing.
That looks amazing, and way to be real and non- perfect with this, I love it!
Check out my project over at http://www.migonishome.com. I made a tufted headboard.
I’m your newest follower.
Looks fantastic and I love the numbers on the wall! SO cute!
I would absolutely love if you linked this up to my new linky party going on now!!!
http://www.classyclutter.blogspot.com/2012/02/saturday-spotlight-3.html
xoxo, Mallory @ Classy Clutter
Well it does look awesome indeed. My husband learned that lesson the first time around…OH boy it was a bad day around here LOL. Thanks for sharing.
Love this – We have yet to do this in our new home but we did in the master bath of our old house and I cannot wait to do it here!
http://www.thediyvillage.com
What a great transformation, very nice work. I’m following via GFC and Linky.
Kelly @ herringbone lane
You did a great job on this transformation. It looks really awesome. Thanks for sharing your creative inspiration at Sunday’s Best Par.tay!
LOVE it Linda!! Great transformation. Thanks for linking up this week!
Featured this post on You Stink tonight on Hating Martha! Not cause you stink but cause you stink at adhesive!
This is exactly what I was wondering if I could do to those big old ugly builder mirrors that we have in our bathrooms. I can’t afford some pricier options so I wondered if this would work. Can’t wait to tackle this.
I absolutely love this method of sprucing up a plain, boring mirror! I have seen it floating around Pinterest, but this is the first I’ve seen a how-to on it. Thanks so much for sharing all of your pointers. I am definitely doing this in both of our bathrooms. You know, when we manage to get around to doing something with them.
I just found this post on a Google search. I am revamping my master bath and want to frame my plain jane mirror as well. Yours turned out great!
PS. I love the numbers on the wall. Cute!
Looks great!