… often times is another woman’s treasure.
But not always. Because taste and style are taste specific. Individualized. To each his own, I say. Not everything will appeal to everyone.
And just because I have no plans to emulate someone else’s decorating style, it doesn’t mean I don’t appreciate what they’ve done … and the hard work they’ve put into creating a look that fits their own personal aesthetic. But this …

This is just plain ugly. No ifs, ands or buts.

I can’t imagine a couple strolling through the lighting section at Home Depot or Lowes sometime in the late 80’s or early 90’s and saying …
More like the nail in the coffin.
Now our ugly ceiling fan was here when we moved in 17 years ago. So that whole imaginary ceiling fan love conversation did not happen between my husband and I …
… though I should be reprimanded for letting that ugly ceiling fan remain in our home unchanged or unchecked for way too long …
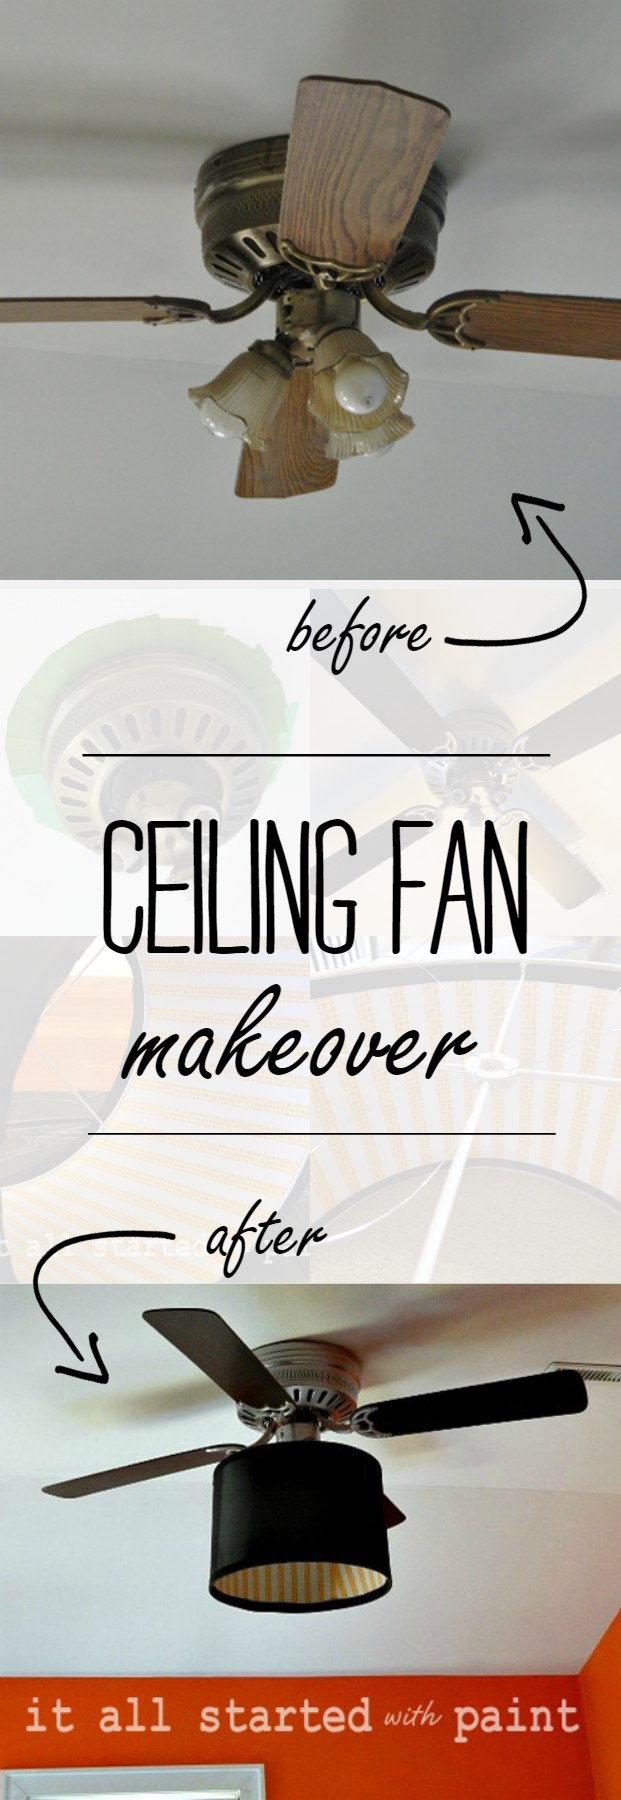
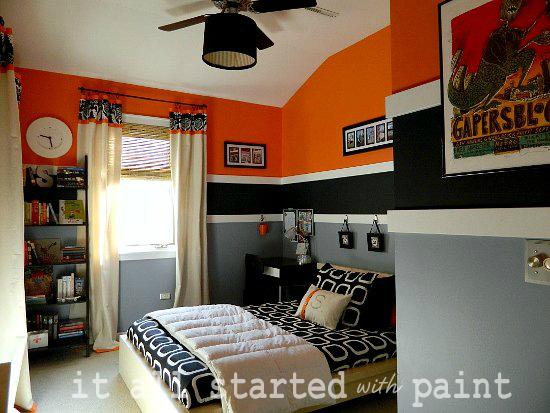
When I decided to redecorate my son’s room — where the ugly ceiling fan resided — I knew it had to go. Well, more like had to change. It needed a full on ceiling fan makeover. So I started here with the removal of the fan blades and globes …


Taping off the motor was interesting. But once I figured out how to fit some square pegs into round holes, I gave it a coat of silver …


… yeah, me hanging off the top rung of the ladder painting the ceiling fan motor upside down was quite the harrowing and dizzying adventure …
As for the fan blades, I had grand plans to do something amazingly creative like this …
But in the end, purchased some affordable fan blades (and some new non-brassy screws) that I attached to the freshly silver painted fan blade holder thingies (yes, that’s the technical term) …


… and (this was interesting) reattached the new fan blades to the motor while hanging upside down from my rickety ladder …

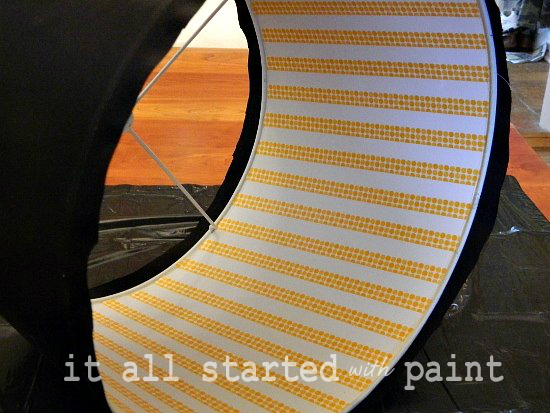
And I was ready to leave as is. For about three seconds. Because I had a drum shade in the wings waiting to be attached. You can see how I dressed it up here …
I’ve had quite a few questions about how I attached the drum shade to the fan …
… so now I’m sharing the deep dark secret …

… picture wire.

It’s far from perfect …


… but I think if my husband and I were strolling through the lighting department at Home Depot or Lowes and I looked up and saw this …

I might just say, “I like that ceiling fan …”

You Might Also Like …
well you did it again my friend! that ceiling fan rocks!!!! hugs…
Okay…now you can come to my house and do that to the ugly fan in my kitchen/den. Thanks!
I love that! and the stripes on the inside of that shade are AWESOME!!!
Great job! I’m so inspired now… and I’ve gotten rid of all the ceiling fans that used to be in my house. Crap!
lol!
Love the look!
it looks fabulous- much classier!
Great solution.Love the new look.
Anne
I love it, MUCH better, seriously!!
I absolutely love it!!! You did an excellent job. 🙂
Kristin
Great job! I love the masculine look it has now now.
I must say though, that the before pic looks quite similar to the ceiling fan in my bedroom, although my three glass shades are frosted white,rather than yellow. They are a little bigger, with broader ridges and prettier (IMHO) fluting than your before. Other than that, they are very, very similar.
I remember my husband and I spending quite a bit of time on the fan aisle of Walmart choosing it in 1993. It was our anniversary present to each other. It was a bit of a splurge at about $70. We decided it was worth the money though because we loved it and it had a 20 year warranty.
It did turn out to be a good investment. I am sitting under it right this minute and it is whirling away. I love ceiling fans and this is by far the best one we have ever had. I still think it’s pretty and I still love it! 😀
Well YEAH! (That’s similar to Hell Yeah, but the emphasis is a bit different, more like yes you bet). I owned that same ceiling fan/fixture at my last house, and I wonder what they did with it? I could peek in the winders and leave your link on the door. OH NO, wait…. I think I have something similar to that here, in this house, in my daughters room. Say it isn’t so!
~Bliss~
I love that your “far from perfect” looks like perfect in my world!
It’s stunning! Did you need to turn the electricity off to do all the work?
Oh and….
That couple strolling through a ‘mom and pop lighting store’ in the 80’s (because the big conglomerates had not taken over every thing from gum to cherry juice to pizza to tires YET) would have had two options in fans – the one they chose at your present home OR a 24X24 monster that sat on the floor next to hubby’s recliner, which when ON made him get up and turn the volume up to HIGH on the TV set!
xo
~K
ps – And I like Whitney, thought, you bought that fan like that!!!!
OK, true confession time: I was once part of that couple. I bought several brass monstrosities when my husband and I were building a house in the early 90s. Like Kolein notes, there weren’t many choices. And, I had no idea what I was doing or what the options were. (Unfortunately, in husbands as well as fans. Don’t have either of them anymore.) Just want to give you a big high five for the idea, though, that some things are just plain horrible, regardless of style or taste. Goin’ out on a limb and saying that faux-wood anything is one of them!
This is brilliant! We love how much personality you added to the room with this!!
xoxo,
mk & Gwyneth
I love it! I’ve been trying to get rid of ceiling fans in our house, but my husband loves them, so no dice. You really did a great job transforming that fixture though!
This is a fabulous transformation!!! Love it, so much more today! Wonderful job!
Happy Easter.
xo
OK…don’t make fun…it was probably me in the 80’s saying..oh honey…look at that fabulous woodgrain..and those fluted shades are just the bomb!!!…..So Linda, no making fun at us old folks, cuz in 2022, they will be saying, “now what were they thinking!”
We all dance to the beat of a different drum shade!
Have a wonderful Easter with your family!
Simply brilliant! I am totally copying your drum shade (just letting you know!), but I am even more impressed that you dismantled and reassembled this on your own! I’m sure I’d screw it up somehow. 🙂
I was waiting for the whole chandy-fan tutorial! It’s amazing. No more words, I’m typing with one hand while nursing and “reading” Amelia Bedelia.
Jessica
stayathomeista.com
First of all, I love what you did to the fan. It looks awesome! Secondly, I am laughing so hard because I still have not one, but two of these hideous fans in my house. One even has mallard ducks on the globe! My husband won’t let me change them because he has a thing about noise and they are quiet fans. There might need to be an unfortunate accident….. (to the fans, not my husband),
Aaaaah! Thanks for the mention! Your fan turned out so well! It looks so modern and sophisticated and perfect for the space. Loving the drum shade, too. I have a shade stashed that I’ve been planning to use on another fan, too. Terrific job!
Ha!I think it’s safe to say we all have had one of those ugly fans at one time or another. But seriously, You did an amazing job..wow
I love this SO much! Such an impressive transformation!
It really is awesome Linda, I’m pinning it. 🙂
17 years with that – did you avert your eyes whenever you entered your son’s room? Did you flee quickly when dropping off clean laundry?
Love it – especially the washi tape! Now you can linger in your son’s room and admire your work of art! I think I hear Home Depot calling.
Kelly
Looks SO good!! But don’t you kinda at least a little bit miss those smoky yellow shades? So dreamy! 🙂
Just ran across your site from Savvy Southern Style and I have a few of those “vintage” ceiling fans that are in desperate need of renovation. This is a silly question but did you spray paint or use a brush to paint the silver? I am trying to get the courage up to re-do mine.
Pat, I tried to email you directly but it showed up as a “no-reply” … I hope you check back. I painted the silver paint on. I just used a little foam brush and threw it out afterwards. And I painted in right in place …
🙂
Linda
I had no idea that you could make over a ceiling fan like that! I’m definitely pinning this for when we move into our new house. There are some ugly fans in there that can sure use some makeovers.
One word….Genius!
lol It’s not like that fan and alot like it haven’t been replaced by now by alot of people. We had some in a house we had and that was first thing I replaced.
We didn’t have alot of choice in the 80’s as to style, at that time that was the ultimate in style, shudder, shudder.
Fans do serve a purpose tho. We have them in our living room, mud room and master bedroom. We replaced the ones in living room and our room as they were just like yours. UGH.
I’d love to have one of fans with really aweswome looking tropical fans on it but that was way out of our budget. At night it gets cold with cooler going so we turn cooler off to just have the fan running. But we’re old so we get colder, lol. Our bedroom is like an oven tho so fan usually gos all night on low.
Lowe how you overhauled that fan, what a difference. I think they do have replacement blade holders also now that are much more attractive in case you decide you want to replace those also. That barrel shade makes such a big difference. The fans are kinda hokey but they do serve a purpose depending on where you live.
We have a single wide and the only vent for our cooler is in hallway in front part of the house. Our kitchen, mudroom and bedroom/bathroom don’t get any air so we die in that end of the house. Hence the ceiling fans.
When I’m in my studio and sewing room (front part of house) it gets really hot, sweat running. Good places to lose weight. I’m still waiting to get ceiling fans in those rooms and they’re tiny to boot, phewy in summer. Really stupid not putting any other vents for the cooler in other end of house. We have an evaporative cooler, most people do here, (Grand Junction, CO).
Thanks for sharing your ceiling fan project, it rules. I’m going to see if I can find a barrel shade for fan in the living room. The lighst are pretty glarey when we turn them on. On top of that, UGH I’m embarrassed to say there are mirrors on ceiling around the fan. DOUBLE UHG! Got any ideas what I could do to those horrors?
Hello, Newest linky follower, love what you did with the fan! Very clever! I will return to check out your blog, hope to see you visit and follow!
came over from DIY showoff. What a great idea! pinned it!
OMG!!!! I have the same ceiling fan! LOL It too came with my home. In fact I have two of them! Does the drum shade move or make noise when the fan is on? One is in my master bedroom and although I cant stand how is looks I like the breeze it makes. Also mine seems really low?
How did you attach it to the fan? Did you have any issues with the balance of the fan once it was attached?
I used picture frame wire to attach. And, no, nothing happened to the balance of the fan!
Well, we certainly think a lot of ourselves, don’t we?